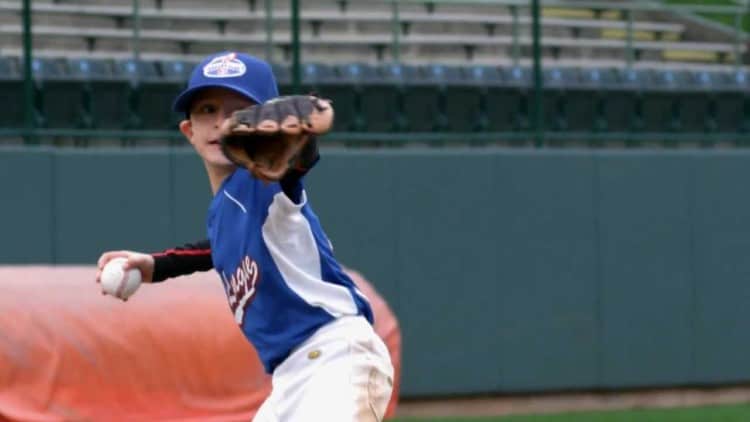
One of the biggest challenges for tee ball coaches is improving the throwing ability of their players. The tee ball player’s entire body is involved in throwing accurately. These 9 Tee Ball Throwing Drills will help your players improve greatly while having fun doing them.
Most of these drills are even more effective when the coach involves either the parents of the players or assistant coaches to carry them out.
Team Throwing Drill
This drill is for the whole team. It focuses on improving throwing accuracy. This drill works best when there are assistant coaches to keep control of the players and keep track of the scoring.
For this drill, you’ll need three traffic cones, three hula hoops, plastic balls and a fence. The team is divided into three sets of players, each standing about 7 feet away from the fence. Three hula hoops, one for each team of three or four players, are affixed to the fence at about the same level as the player’s height. Players stand in a straight line behind each of the three traffic cones.
The coach says “Go,” and the first team member in each line tries to throw the ball through the hoop. There is a coach in each line of players who keeps count. After each player throws, he goes to the back of his line.
The total number of successful throws through the hula hoop is three, and that team wins. Do three rounds with three as the winning number in each. Or, you can make it a best of five. If 7 feet becomes too easy for players to hit the target, move the cones back a few feet. Like all tee ball drills, keep it fun and competitive.
Flicking the Ball Drill (Focus on Wrist Action)
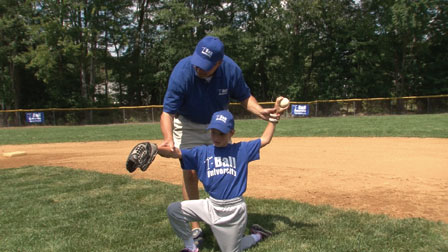
In this drill, players get together in a group a practice throwing from a kneeling position. Without using their legs or feet, the drill places the focus on the upper body, especially the arms and hands. By doing this, tee ball players improve their upper body mechanics to make more accurate and powerful throws.
 For this drill, get parents involved, or at least a few assistants. If you wish to try without assistants, players can line up next to each other in two lines, one partner throwing and the other catching. The more one to one this drill is performed, the better you’ll know as coach which issues need to be corrected in each player. The drill is also a fun challenge to tee ball players.
First, demonstrate to players how to throw from kneeling position using the proper grip. Learning the mechanics early will make them much better throwers later on.
- Players face their partners, kneeling on their left leg. For lefties, they kneel on their right leg.
- Their non-throwing arm is placed on the leg they will step with.
- The right elbow (reverse for left-handed throwers), rests on their baseball glove on their right side.
- With the elbow in place, the player flicks the ball to either a parent or a teammate.
Wrist action is stressed before the two-finger grip is. Once they are able to flick the ball well enough to reach their partners, only then should your focus switch to gripping the ball.
Kneeling and Throwing Drill
Once they are able to flick the ball successfully, they kneel now on both knees to throw. When demonstrating, show them to keep their arms and fingers pointing back and nearer to them for the throw. Make sure they keep their hands away from their ears. This throwing method is used throughout Little League, high school and college.
- Partner remains at the same distance as the earlier flicking drill.
- The drill focuses on their wrist action as well as their throwing mechanics.
- Check their wrist action and arm positioning to make sure they’re getting as much power behind the throw as they possibly can.
- Make sure they’re not “short arming” the throw. Watch to make sure the arm remains above the shoulder and the hand away from the ear. This will prevent the half throw.
- The objective is to get as much arm extension as possible.
- Make sure the fingers gripping the ball (two fingers for larger hands, four or five fingers for smaller ones), are away from the ears.
Standing and Throwing – Hip Turn Drill
This drill follows the previous two. Players stand and assume throwing position. Their feet are shoulder width apart. During the throw, the feet remain planted on the ground.
Before they throw, coaches make sure their wrist action remains the way it was when flicking the ball. Their fingers are away from the ear and the arm is completely extended.
Have players practice throwing while keeping both feet planted on the ground. In this way, you can observe their hip action.
In the throwing movement, the hips are engaged first. Following this, their body turns in the direction of their throwing arm. Lastly, they throw the ball to their partners.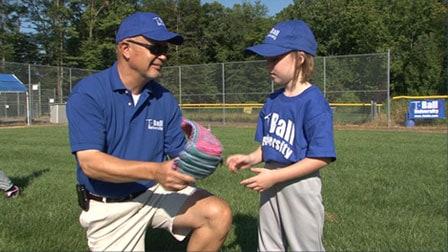
Spend anywhere from 7 to 10 minutes having the players throwing without moving their feet. This teaches them to pay attention to their upper bodies while they throw. Using only their upper bodies, kids are able to fine tune the throwing motion to get the results you want.
Have partners stand about 7 feet away. Once they are able to hit their target every time, increase the distance to 10 feet or more. The more power you can get them to place in their upper body (wrist, arm and fingers), the better they will be when their legs and feet are engaged in the follow through.
Step and Throw Drill
This is the final step of these series of drills, and it involves using the entire body. The players stand and step to their partners.
Coaches should check for the following during the full body throw:
- When they step and follow through, the back legs come around.
- Pushing off from their standing position: the hips turn, and they follow through with their right leg (the opposite for lefties).
- The step is made with their throwing leg.
Have each player practice throwing to his partner about 15 times each. This should warm up their arms sufficiently. Once they can throw for the short distance (about 10 feet or less), only then should the long throw be attempted in a drill.
Fundamentals of throwing should be developed first before any longer throws are attempted. This includes
- the wrist flick,
- the hip turn,
- the arm above the shoulder
- the hands away from the ear.
Each of these aspects should be in play when they’re throwing in their “power position.” Because these drills are macroscopic in nature, you want to make sure the kids don’t become impatient. Try to make friendly competitions out of each aspect of the drill.
Because they are little kids, their focus will not be where you want it all the time. You need to keep the engaged and interested. For example, if they are successful at each step of the throw as outlined above, you can let them take a run around the perimeter of the field or offer a prize for successful completion. The reward is entirely up to you. Keep in mind the less attentive nature of these players and find a way to have them stay focused.
The drills should be short, and it’s best when you move from one to the next as quickly as possible.
Leaning Stance Drill
This drill will have your players attempt to throw longer than 10 feet. Young players this age will tend to push the ball away from them, and to only use their upper bodies.
You’ll want them to use the big muscles of their bodies to make long throws, especially thigh and calf muscles.
This drill is a body mechanics drill and will not involve using a baseball. Line up your players along a wall or a fence that they can lean into.
- Have your players line up about a foot away from a fence and wearing their baseball gloves.
- Left handed throwers face the fence with the right side of their bodies, and right handed throwers with the left side.
- Demonstrate first. Explain to players to pretend as if they are pitchers making a throw.
- Raise your hands as if you’re making a pitch.
- Pull your hands apart for the windup.
- Your hip leans into the fence.
The main purpose of this drill is to make players lead with the front hip for distance throwing. Have your players simulate your motion into the fence. The drill teaches players the essential purpose of the front hip in their throw. The drill will put in their minds that leading in with the front hip comes before actually throwing the ball for distance.
Throwing with Legs Drill
In every role a player assumes in the game of baseball, whether it’s hitting, running, catching or fielding, all movements start from the ground up. In throwing, players rely too much on their upper body, when the best throws incorporate the lower body much more than the arms and hands.
The muscles of the arms and shoulders are much smaller than the big muscles of the upper and lower legs. Most of our strength originates from below the waist. Every throw would start there.
For this drill, have players partner into teams of two. Coaches should try a longer distance first before closing the distance between each pair of players. This drill is a prelude to effective long throwing, so make the distance between each player farther apart.
- The player who’s throwing lines up with feet squared towards his partner. Player is positioned sideways to his target.
- Feet square and perpendicular to his partner should be closely observed by the coach, since young players tend to move their front foot to the right or the left of his target. This will cause him to throw with less power and accuracy.
- This is a “bow and arrow” position. Shoulders are also square to the target.
- Next, instruct players to rock back off their front foot. This is called “loading.”
- Weight is pushed back toward their throwing arm.
- Push the back leg into the ground to regulate movement forward, so throwing strength is transferred to the front of the body along with the throw.
- As the stride begins, the hands separate, and the arms move out.
- Make sure the front load of the legs and the arms separate the same exact time. This will keep the core of strength where it needs to be.
- For right handed throwers, the left, gloved hand tucks in slightly.
- Leading with the elbow and the throw, the ball is released.
- Keep fingers on top of the baseball, and apply the wrist flick action, but only enough to allow for a good, strong throw.
The purpose of this drill was to get players working on their throwing mechanics. Kids are ungainly and much of this is difficult for them to do at first.
But coaches only need to see that their youth players have good form as described here. Not every movement needs to be perfect (it most likely won’t be).
What you’re really looking for is that they have good balance in their long throws, that they don’t lean back too far, and that they load their throws in such a way that they’ll have the most power behind the ball when it’s released.
Throwing Accuracy Drill
This drill prepares young players to throw accurately to a specific target. It simulates an infield play, so the target should be standing at first base.
A youth player will not be very accurate with his throw at first, so the coach or a parent can stand behind, or to the left or right of the player catching at first base.
You want the player to get as close to the target as possible. For this drill, you can place a player to catch at every base bag if you have assistants to roll ground balls for the thrower to catch and release to his fielder.
For example, you would have an assistant at first, second and third. This would allow for 6 players to be involved at the same time, so they remain focused and interested, with less players waiting their turn.
- Roll a soft ground ball to the player, who is 10 feet or less away from his target catching at the base bag.
- The player retrieves the ball. Coach tells thrower that the target is not the player waiting to catch, but rather his glove. The glove of the catcher is a much smaller target than his whole body, helping his throw to be more accurate.
- The player at first (or assistant/parent behind him), throws the ball back to the coach.
- Observe your thrower’s body mechanics as described in the earlier drill. You want his load, stride and throw to be as compact as possible so his throw ends up close to the target.
Even if the throw is far from the target, kids should be applauded for their attempts to throw accurately. After getting positive feedback, tell your players to try again to get closer to the glove.
Repeating this more difficult tee ball drill every time you get together with the team, will begin to yield positive results. Players have more fun and stay roe focused when they feel they are playing better.
Three Step Throwing Drill
This is perhaps the most “serious” drill listed here because it requires complete focus on the part of the thrower. By incorporating all the throwing mechanics listed above, the player will throw with strength and accuracy.
For this drill, player partner up either with another player or an adult, and at a good distance away (more than 10 feet.)
- A ball is thrown so it’s caught above the opposite shoulder of his throw (right handed throwers catch the ball above the left shoulder, and left handed about his right shoulder).
- The thrower sets up to prepare to throw. As he strides, he steps first with his left foot, followed by his right foot behind his left foot, then his left.
- He plants the third step left foot and throws the baseball to his long target.
- The ball is thrown, and the player tries to be as accurate as possible to his target.
- Always make sure the tower is square to his target by making his shoulders perpendicular to it.
- The target is at the face region of the catching partner.
You can make it a game for your players.
- 3 points if the ball is caught at or near the face.
- 2 points if it is caught near the chest.
- 1 point if the ball is thrown at caught in the area of the stomach.
The first player to reach 15 points is the winner.
It’s important for kids to have fun at this age during practice, so turning every drill such as this one into a game or a competition keeps them interested and engaged.
Don’t underestimate what young children can do. Often they go beyond our expectations when we challenge them to a task we assumed was beyond their ability. Coaches should “push the envelope” from time to time and see how much their kids can do.
Often you will find one or two children who can play at a higher level than the rest of the team. These players should be encouraged to go beyond their noticeable abilities and to test harder skills like long ball throwing and throwing for near perfect accuracy.
Keeping it fun will improve the abilities of every player on the team. Keeping the drills short and focused will also keep them focused and interested.