Baseball is a great sport for kids to learn teamwork, discipline, and physical skills. However, it does come with some inherent injury risks if proper techniques are not taught. As a seasoned player and long-time youth coach, I’ve learned the safest and most effective ways to teach young players how to slide to avoid injuries on the basepaths.
The keys to teaching safe and proper sliding technique are using the right stance, having proper form during the slide, sliding at the right time, and wearing the appropriate protective gear.
Choosing the Right Sliding Stance
The stance you take right before the slide is crucial. Taking the wrong stance can make the slide awkward, off-balance, and more likely to cause injury. Here are the proper stances to teach:
- Bent-Leg Stance: This is the classic sliding stance seen in baseball. The striding leg should be slightly bent, not straight. Keeping a slight bend absorbing shock better and allows for a smooth transfer of weight.
- Low Center of Gravity: Get as low as you can. Bend the knees and get your butt down. This lowers the center of gravity for better balance and stability during the slide.
- Weight on Balls of Feet: Balance on the balls of your feet, not the heels. This allows you to transition your weight and spring into the slide.
- Arms Back for Balance: Keep your elbows back and pointed behind you. This counterbalances your lowered center of gravity. It prevents diving forward onto your head and arms.
Getting into a proper stance keeps you balanced, steady, and ready to slide with maximum control. Take the time to coach proper ready position mechanics.
Perfect Sliding Form
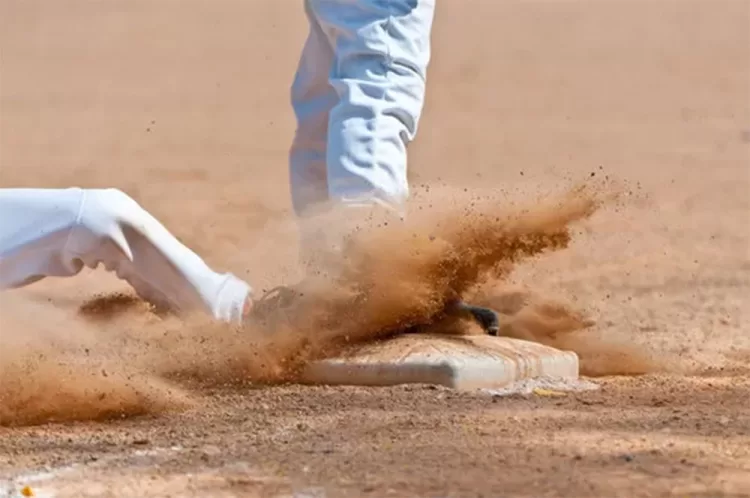
Once you take off from the stance into the slide, holding the right sliding form is critical. The slide should be smooth, balanced, and absorb impact gradually over the slide:
- Lead With the Leg: The striding leg should stay just slightly bent as you begin sliding. Extend it toward the base, leading with your leg and keeping your foot up.
- Keep Low: As you slide, stay as low as possible to the ground. The lower you slide, the more gradually you can decelerate and absorb the impact.
- Lean Back: Keep your upper body leaning slightly back to keep weight off your forward leg. This protects the lead leg from jamming into the ground.
- Arms to Side: Keep arms extended to the side with palms facing up or toward the body. This provides stability and protects the arms from jamming during impact.
- Head Up: Keep your head up and your eyes focused forward throughout the slide. You need to watch for the base and see where you are sliding. Dropping your head is a frequent cause of injury.
Taking the time to coach ideal form will give players the muscle memory needed to slide properly in the intensity of a live game. Be sure to demonstrate proper technique and have players practice repeatedly.
Choosing the Right Time
A clean slide technique won’t protect from injuries if the timing of the slide is off. Here is when to teach initiating a slide:
- Too Soon: Don’t start the slide too far from the bag. Starting early causes you to slow down too much and leads to being tagged out.
- Too Late: Don’t wait until you’re right at the bag. This won’t leave enough time to complete the slide and leads to dangerous “into the bag” collisions.
- 3-4 Steps Out: Teach players to start sliding when they are 3-4 strides away from the base they are trying to reach. This allows enough distance to perform a safe slide.
- On Dirt: Slides should be started when a runner hits the dirt portion of the field, not in the grass. Starting on dirt gives the right slide distance.
- Eyes Forward: Runners should keep their eyes forward, focused on the target base. Don’t look down or back. Seeing the bag is key for proper timing.
In live games, teach players to use visual cues like seeing the base come into peripheral vision to know it’s time to slide rather than counting steps. With practice, sliding timing will become second nature.
Wearing Protective Gear
Using proper protective equipment adds an important layer of safety to sliding:
- Padded Sliding Pants: Wearing sliding pants with extra padding protects the hips, thighs and tailbone when making frequent slides.
- Sliding Mitt: Wearing a good quality sliding Mitt decreases the risk for injury on the hands.
- Sliding Leg Guards: Leg guards protect the shins and calves against abrasions and bruises during slides.
- Batting Helmets: Always wear a helmet, even when running the bases. A helmet protects the head if it inadvertently hits the ground.
- Molded Cleats: Cleats should be made from molded plastic or rubber rather than metal. Plastic cleats are less likely to get caught and cause leg injuries.
- Close Jerseys/Pants: Make sure jerseys and pants are the right size and don’t have loose or baggy openings. Loose clothing can cause appendages to get caught during a slide.
- Jock/Cup: Male players should always wear an athletic cup and jock strap for protection of the groin.
- Long Socks: Pull socks high up to protect ankles and lower legs fully. This also prevents abrasions from the dirt.
Take time to talk about protective gear. Though not directly related to technique, it’s an important part of keeping players safe out on the field.
Making Slides on Steals vs Hits
The slide technique changes slightly between a stolen base attempt and sliding into a base after a hit:
- Stolen Base: On stolen bases, teach hook sliding. Hook the trailing leg around the corner of the bag to avoid over-sliding.
- After a Hit: Sliding straight in is more appropriate when approaching at full speed after a hit. Trying to hook slide risks injury at high speeds.
- Headfirst: Headfirst slides should only be used as a last resort “diveback” to retreat to a base, not for forward progress. Too much injury risk.
Coach players to adjust their approach based on the game situation. Stolen base slides warrant more of a curved, hooked slide, while full speed slides are safer going straight into a bag.
Additional Coaching Tips
Here are some additional best practice tips for coaching kids on safe sliding technique:
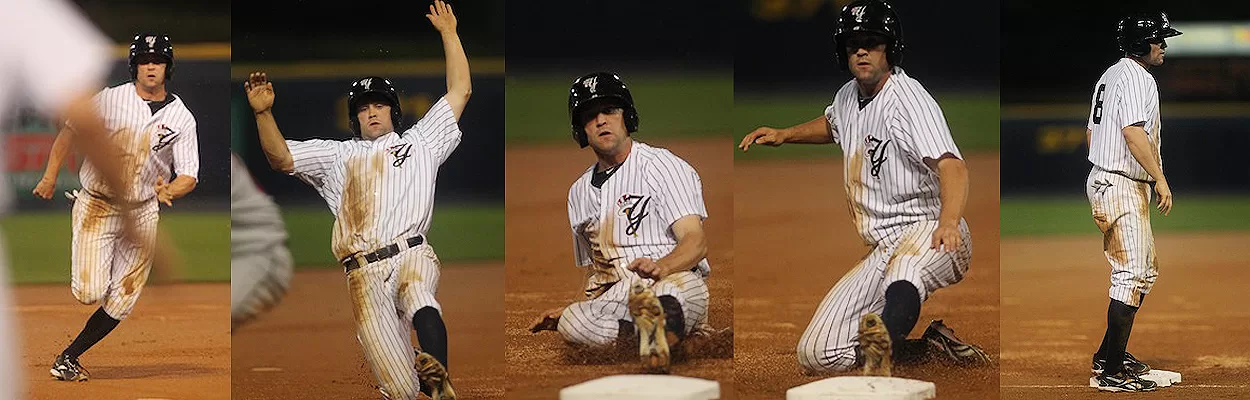
- Break Down the Steps: Teach the entire slide in a step-by-step manner. Breaking it down makes it less intimidating to young players.
- Lead with Examples: Demonstrate proper form. Have experienced players who slide well show the technique.
- Walk Through Slowly: Before live reps, have players slowly walk through the approach and slide. Reinforce key coaching points during the walkthroughs.
- Drills for Weight Transfer: Incorporate leaning drills, simulated landings, and slip slides. These help players get used to transferring weight properly.
- Repetition: Players will develop muscle memory faster with frequent, high repetition practice. But be sure to watch and correct major form issues during repetitions.
- Keep it Fun: Players learn better when they are having fun. Incorporate slide races, obstacle courses, or have kids cheer each other on.
Following these tips will lead to rapid skill development and safer play. With the right coaching, young players can learn proper sliding for a lifetime of baseball enjoyment.
Mastering the fundamentals of baseball sliding is a crucial technique that helps young players reach bases safely while avoiding unnecessary injuries. Coaches with years of playing and coaching experience have an ideal knowledge base for passing on effective sliding mechanics to the next generation of baseball talent. Focus the instruction time on nailing the proper stance, weight transfer, and form – along with wearing the right protective gear and understanding when to initiate the slide.
Breaking down the slide components, demonstrating proper technique, running focused drills, and keeping the lessons engaging will ensure players rapidly pick up this vital baseball skill. With the right training, young athletes can slide with confidence while minimizing injury risks as they enjoy learning and playing the game. The time spent teaching proper sliding fundamentals will pay off with safer play for many baseball seasons to come.
Learning Proper Footwork and Leg Positioning
A slide is only as good as the footwork used to execute it. Solid footwork and leg mechanics are vital to safe and effective slides. As a coach, I focus heavily on teaching proper foot and leg techniques early on.
I’ll never forget a time when I was coaching our 11-year-old rec league team several years back. We had a speedy player named Timothy who could outrun any throw to second base. But he was timid about sliding and would often run straight through the bag to avoid it.
During one game, I noticed the opponent’s shortstop was playing extremely shallow. I knew Timothy could beat the throw by a long way. But as he rounded second, the shortstop wound up and delivered a missile to second in plenty of time to tag him out. Timothy awkwardly stopped running and tried to scamper back too late.
After the play, I pulled Timothy aside and asked him why he slowed down instead of just sliding in safely, especially with how shallow the shortstop was playing. He admitted he was scared of sliding incorrectly and getting hurt.
That’s when I made it my mission to coach Timothy on proper footwork and leg mechanics for sliding. We started with basic slip slides to get him used to transferring his weight and balance to the leading leg. Then we progressed to leap slides where he simulated the landing and lead leg extension. After just two practices, his sliding form improved dramatically.
The next game when Timothy got on base, sure enough the shortstop was playing shallow again. This time Timothy kept running hard all the way to second. He nailed the lead with his left leg, keeping it bent, and slid in perfectly under the tag with his trail leg tucked. The umpire called him safe. Timothy popped up smiling, no longer fearing the slide. Getting the footwork fundamentals right had clearly given him the confidence to slide with assurance going forward.
Perfecting Your Approach Angle
The angle that a runner approaches the base is another subtle, but important element for proper sliding. Approaching the bag at the ideal angle leads to a straight and balanced slide. A poor angle of approach can cause an awkward, risky slide.
I teach players to visualize railroad tracks laid out from first to second and from third to home. When going base to base, imagine running in a straight line right on top of the tracks. This keeps your body and slide directly in line with the base instead of approaching from the side.
Of course, railroad track style base running isn’t always possible during live games due to game situations and positioning. But it’s a great mental image for young players to start with for learning a straight-on approach.
Once players have the visualization down, we move on to approaches from realistic angles using angled cones as guides. I’ll roll ground balls set up to emulate throws, then have players run natural curved paths around the cones as if avoiding a live tag. The cones guide them to approach the base for the slide from an ideal angle.
With enough quality repetitions from various angles, players will instinctively approach for proper slides without the coned guides. The muscle memory takes over for seamlessly adjusting the approach on the fly during real game action.
Getting the basics of approach angles ingrained early allows more focus on slide timing, form, and technique as kids continue progressing through more advanced drills and simulations.
Sliding Technique Differences on Natural vs Artificial Turf
In today’s game, more and more youth and high school fields are installing artificial turf instead of natural grass. This changed playing surface requires adapting sliding techniques in subtle ways to avoid injury:
On Natural Grass: Grass fields provide a more cushioned, forgiving surface. You can slide more aggressively by leading with the shin or full leg. The grass absorbs some impact.
On Turf: Leading with the shin directly into turf should be avoided. That can cause cuts, scrapes, and even fractures from the unforgiving surface. It’s best to lead with just the upper foot on turf, keeping the shin elevated off the ground.
Slide Earlier: Begin the slide a step or two earlier on turf to account for less slide distance. Turf creates more friction and slows slides down more rapidly than grass.
Hold Form Longer: When losing momentum, hold proper slide form longer on turf before transitioning to avoiding a tag. Prematurely breaking form leads to abrupt stops and injuries.
Condition for Impact: Weight room training takes on heightened importance for playing and sliding on artificial surfaces. Building leg strength helps absorb impact on unforgiving turf.
As turf fields become more common, make sure to adjust sliding instruction based on the playing surface. What may be standard technique on grass may need refinements for artificial turf. Adjusting your approach for the right surface helps maximize performance and safety.
Making Sliding Fun
While mastering sliding fundamentals requires focus and repetition, coaches shouldn’t underestimate the importance of fun! Incorporating creative and imaginative drills keeps players engaged in learning. Here are some fun sliding drills I use:
Slip N Slide Into Bases: A backyard slip n slide with water, safe bases, and mats provides a low-risk way to enjoy sliding mechanics.
Sliding Races: Quick races sliding into bags – either straight on or around angles – creates competition and engagement.
Obstacle Course: Set up ball/glove obstacles to avoid, cones to navigate, and tasks to perform while safely sliding at each base.
Sliding Tag: Similar to flag football, except players try to “tag” each other with soft balls while sliding around the field.
Slide Down Slippery Slopes: Using small grassy slopes or dirt mounds teaches slide techniques in a new environment.
Water Slide Practice: If a water park is nearby, use the slides (carefully) to work on sliding form and weight transfer.
Finding ways to inject fun and creativity into sliding drills keeps kids excited to continually refine their technique. Coupling the fun with expert instruction advances both skills and passion for the game simultaneously. Before you know it, safe slides become natural habit thanks to muscle memory developed through enjoyment.
Frequently Asked Questions
What are the most important points to emphasize when teaching sliding technique?
The most critical parts of proper sliding technique are the stance, weight transfer, slide timing, and form. Nail down the ideal stance with knees bent, weight back, and arms for balance. Transfer weight smoothly to lead with the leg and stay low. Time slides to start at 3-4 steps out at full speed. Keep proper sliding form by staying low, leaning back, and keeping the head up.
How can I help players overcome the fear of sliding?
Let players gradually progress at their own pace. Breaking the slide into step-by-step components helps it feel less intimidating. Have experienced sliders demonstrate. Walk through the motions at slow speeds first. Use drill progressions like slip slides. Keep the atmosphere positive and upbeat. Eventually, they’ll gain confidence with enough repetition.