Hello parents and coaches! My name is Mark Hertz and I’m a former college pitcher with over 15 years of coaching experience. In this article, I’ll share the throwing mechanics that I teach my players to help avoid arm injuries like Tommy John surgery.
The keys to teaching proper throwing mechanics are focusing on building arm strength, maintaining proper throwing form, avoiding overuse, and watching for signs of fatigue or pain.
Build A Strong Foundation
The first step is building up arm strength and endurance through a structured throwing program. We focus on high repetition, low intensity throwing to safely build muscle strength and stamina. I start players as young as 8 years old on our throwing program to develop proper mechanics and arm strength over time.
Some key principles we follow:
- Begin with throwing only 2-3 times per week max
- Start at short distances (30 feet) and gradually work back as arm strength increases
- Take periodic rest days to allow the arm to recover
- Focus on form – short, compact motion with proper arm slot angle
- Build up to throwing 3-4 times per week at longer distances (90 feet by age 10-12)
- Closely monitor for signs of fatigue or soreness
With a progressive, structured throwing program, players can develop the rotator cuff, elbow, and scapular strength needed to withstand the rigors of pitching without injury. Rushing the build-up of arm strength is a recipe for injury.
Use Proper Throwing Mechanics
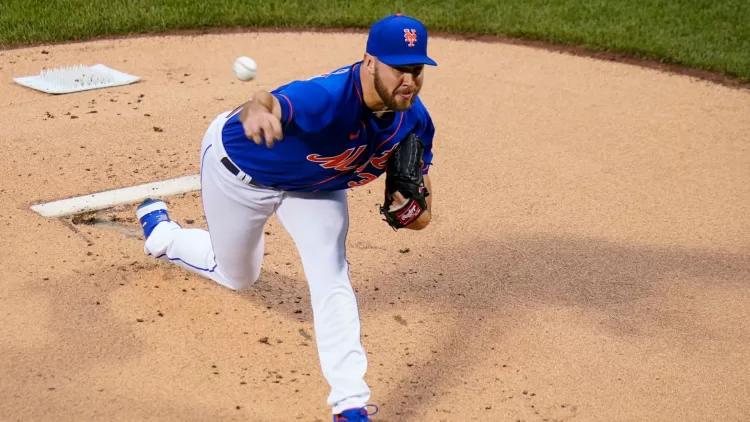
Once players have developed a baseline of arm strength, we really emphasize maintaining proper throwing mechanics. The throwing motion puts tremendous stress on the shoulder and elbow, so using flawed mechanics can quickly lead to injury.
Here are the key mechanics we teach:
Grip: Use a four-seam fastball grip with the seams running perpendicular to the fingers. This promotes good spin and less arm strain.
Stance: Athletic posture with feet shoulder width apart, glove side facing the target, weight balanced.
Windup: Hands together to start, step back with stride leg, keep shoulders closed with chest facing glove side. Hides the ball from batter.
Hand separation: Lead with palm down to initiate separation, keeping elbow above shoulder height.
Stride: Long, controlled stride directly at target, land on stiff front leg with knee bent slightly.
Hip and shoulder rotation: Hips rotate first, followed by shoulders, to generate torque. Hips should be square to target at release.
Arm action: Elbow above shoulder, throwing hand below ball with wrist snapped downward. Elbow leads the throw.
Release: Fully extend throwing arm with whip-like follow through across body. Two fingers on top of ball at release.
Finish: Chest faces target with weight transferred to front leg. Glove side comes across to counterbalance.
This kinetic sequence engages the entire body to reduce stress on the shoulder and elbow. If any part of the delivery is out of sync, injury risk climbs. We constantly reinforce proper mechanics through drills, video review, mirror work, and feedback. Good habits take time to build.
Avoid Overuse
A major cause of arm injuries is overuse. Young pitchers are especially susceptible when the arm is fatigued yet they continue pitching through pain or improper mechanics.
Here are some best practices we follow to avoid overuse:
- Strict pitch counts: Follow league guidelines for max pitches based on age. Generally 30-50 pitches early on, building to 85-100 for teens.
- Mandatory rest periods: No throwing for at least 48 hours after pitching in a game. Also schedule weekly rest days.
- No pitching year-round: Take 2-3 months off from throwing each year. Variety keeps the arm healthy.
- No pitching multiple days in a row: Give the arm 24-48 hours to fully recover between outings.
- Monitor for fatigue: If mechanics decline or velocity drops, the arm needs a break.
- Avoid playing catcher too: Throwing, blocking, and swinging all stress the arm. Catchers need more rest.
- Listen to your body: Stop immediately at any sign of pain, soreness or loss of control.
While complete prevention of arm injuries is impossible, following these workload guidelines minimizes overuse damage. Young arms need time to fully recover between outings.
Watch for Warning Signs
Pitchers and coaches must remain vigilant for signs of potential arm trouble. Catching injuries early is key to avoiding significant damage.
Here are some warning signs to watch for:
- Decreased velocity
- Loss of control/accuracy
- Shaking or flexing arm during game
- Arm soreness lasting more than 48 hours
- Lingering tenderness around elbow or shoulder
- Popping or clicking noises when throwing
Any of these could signal tendinitis, tightness or ligament damage in the elbow or shoulder. At the first sign of trouble, immediately stop pitching and get evaluated by a sports medicine physician. Rest and recovery are essential.
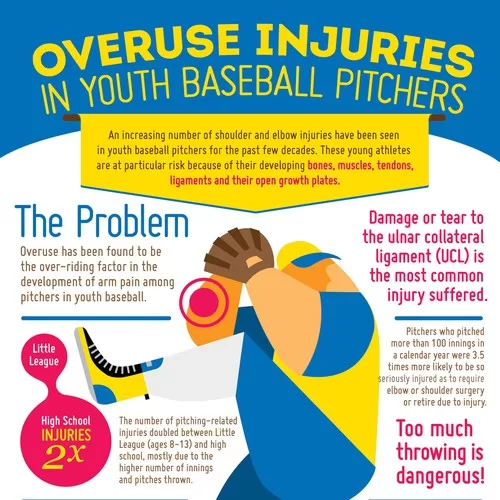
Ignoring the warning signs and pitching through pain often leads to surgery. Tommy John procedures have tripled in youth pitchers over the last decade – a trend we must reverse.
Teach a Proper Warm-Up Routine
A proper pre-game warm-up is vital for injury prevention but often overlooked by youth coaches. We dedicate at least 30 minutes prior to the first pitch for players to actively warm up their arms.
I learned this lesson the hard way in college. During my freshman season, I was rushed to get loose and took the mound without fully warming up. In the 2nd inning, I felt a pop in my elbow on a curveball. I had torn my UCL and needed Tommy John surgery that offseason.
Ever since, I’m very methodical with my warm-up routine. We start with light cardio to raise body temperature and get blood flowing. Next are dynamic stretches for the legs, back, and shoulders. Arm circles get the joints moving through their full range of motion.
Then we begin tossing – starting close with gradual increases in distance. I toss softly on a line, concentrating on smooth mechanics. The wrist flips, arm extends fully, and follow through flows across the body. Once the arm is loose, we add some long toss at 60-90 feet to fully activate the arm.
I teach players to toss until they feel fully loose, not rushing to start pitching. Right before taking the mound, we do dry hand throws to ingrain mechanics. Then game pitches start off slow, adding velocity as comfort builds. Proper warm-up is the foundation for an injury free outing.
Stress Loose Grip and Wrist Flexion
A major key we focus on is keeping a loose grip on the ball and staying relaxed through release. Young pitchers often muscle the ball with a rigid, tight grip, putting extra stress on the elbow.
I tell my pitchers, “Hold the ball like an egg you don’t want to break.” Lightly cradled in the fingers. No white knuckles. This keeps the wrist and elbow fluid during delivery.
We do drills with tennis balls and water balloons to encourage loose fingers, flexing the wrist downward on release. Throwing into a soft net teaches the same loose release. Hitting the net means you’re gripping too tight.
Relaxed wrist flexion follow through is crucial to avoiding elbow hyperextension. I missed this as a teen and it led to my elbow blowing out. Now I constantly remind pitchers to stay loose and whippy at release. It prevents overtaxing those small ligaments in the elbow.
Do Preventative Exercises and Stretches
Off the field, preventative exercises keep muscles flexible and joints stable. We devote time each practice to joint stability, rotator cuff work, and core strength building.
I take the team through sleeper stretches each day – laying on your side, gently stretch the shoulder back behind your body. This opens the shoulder capsule and improves mobility.
Rotator cuff exercises with resistance bands or lightweight dumbbells reinforce all-important shoulder stability. Working the rhomboids and lower traps prevents scapular dysfunction.
For elbow health, we do active stretches spreading the arm wide to flex the UCL. Forearm supination/pronation with a light weight keeps those small muscles strong. Massaging around the elbow relieves tension.
A strong core takes pressure off the shoulder and elbow by driving energy from the legs up the kinetic chain. Planks, crunches, and leg raises all build pitcher’s “abs” so they stay tight during delivery.
Prevention has to go beyond just how you throw – diligent off-field care makes the arm less prone to damage on the field.
Shut Down at First Sign of Injury
If a pitcher complains of any arm soreness, I shut them down immediately. You can’t mess around with arm injuries no matter how minor. My philosophy is rest early so they don’t require surgery later.
I recently had a talented 14 year old pitcher complaining of radiating elbow pain after starts. Rather than pushing through it, I sat him down for six full weeks. He worked on flexibility but no throwing.
After the inflammation subsided, we slowly built his arm back up. Nine months later he’s 100% recovered with velocity intact.
When I was a stubborn teen, I routinely hid arm soreness so I could keep pitching. I thought working through pain made me tough. It took me two surgeries to learn that lesson. Now I emphasize that speaking up about injuries shows maturity, not weakness.
Any arm pain warrants at least 2 weeks total rest. If it hurts to throw, don’t throw! Taking a break now prevents missing a whole season or more later. Patience pays off in the long run.
Conclusion
Teaching proper throwing mechanics and workload management in youth baseball is crucial for avoiding major arm injuries. Players who develop good habits early on and avoid overuse are far less likely to require surgery as they progress.
Coaches must prioritize mechanics drills, incremental strength building, pitch counts, rest periods, and injury prevention above winning games. With a long-term developmental approach, our youth pitchers can play the game they love for decades to come.
The responsibility falls on parents, coaches and the players themselves. We all must educate ourselves and make smart decisions when it comes to arm care. While some injuries are unavoidable, our common sense approach gives young pitchers the foundation to enjoy long, healthy baseball careers.
Frequently Asked Questions
What is the biggest risk factor for arm injuries in youth pitchers?
Overuse is the single biggest risk factor. Pitching too often, throwing too many pitches, and not getting enough rest between outings significantly increases injury risk.
At what age can kids start throwing breaking balls?
We recommend waiting until age 14-15 for curveballs and sliders. The torque required puts extra strain on elbow ligaments that are still developing in younger kids. Changeups are okay earlier with proper mechanics.
How much should a 10 year old be throwing?
For 10 year olds we gradually build up to 30-45 pitches max per outing, 1-2 times per week, with at least one rest day in between. Kids that age should use a baseball weight or tennis ball and throw from 45-60 feet.
What exercises help prevent pitching injuries?
Shoulder and elbow stability exercises using resistance bands and lightweight dumbbells help strengthen muscles that support the joint. Core strength and lower body power are also important. Yoga helps improve flexibility and range of motion.
What is good throwing mechanics drill for youth pitchers?
The towel drill teaches correct arm positioning. Hold a towel in your throwing hand, grip the corners with your thumb and two fingers. Throwing without dropping the towel forces proper wrist and elbow angles through the motion.

Pingback: How Young Pitchers Can Safely Increase Velocity - Baseball Boom